 By Bobby Rahm · August 8, 2026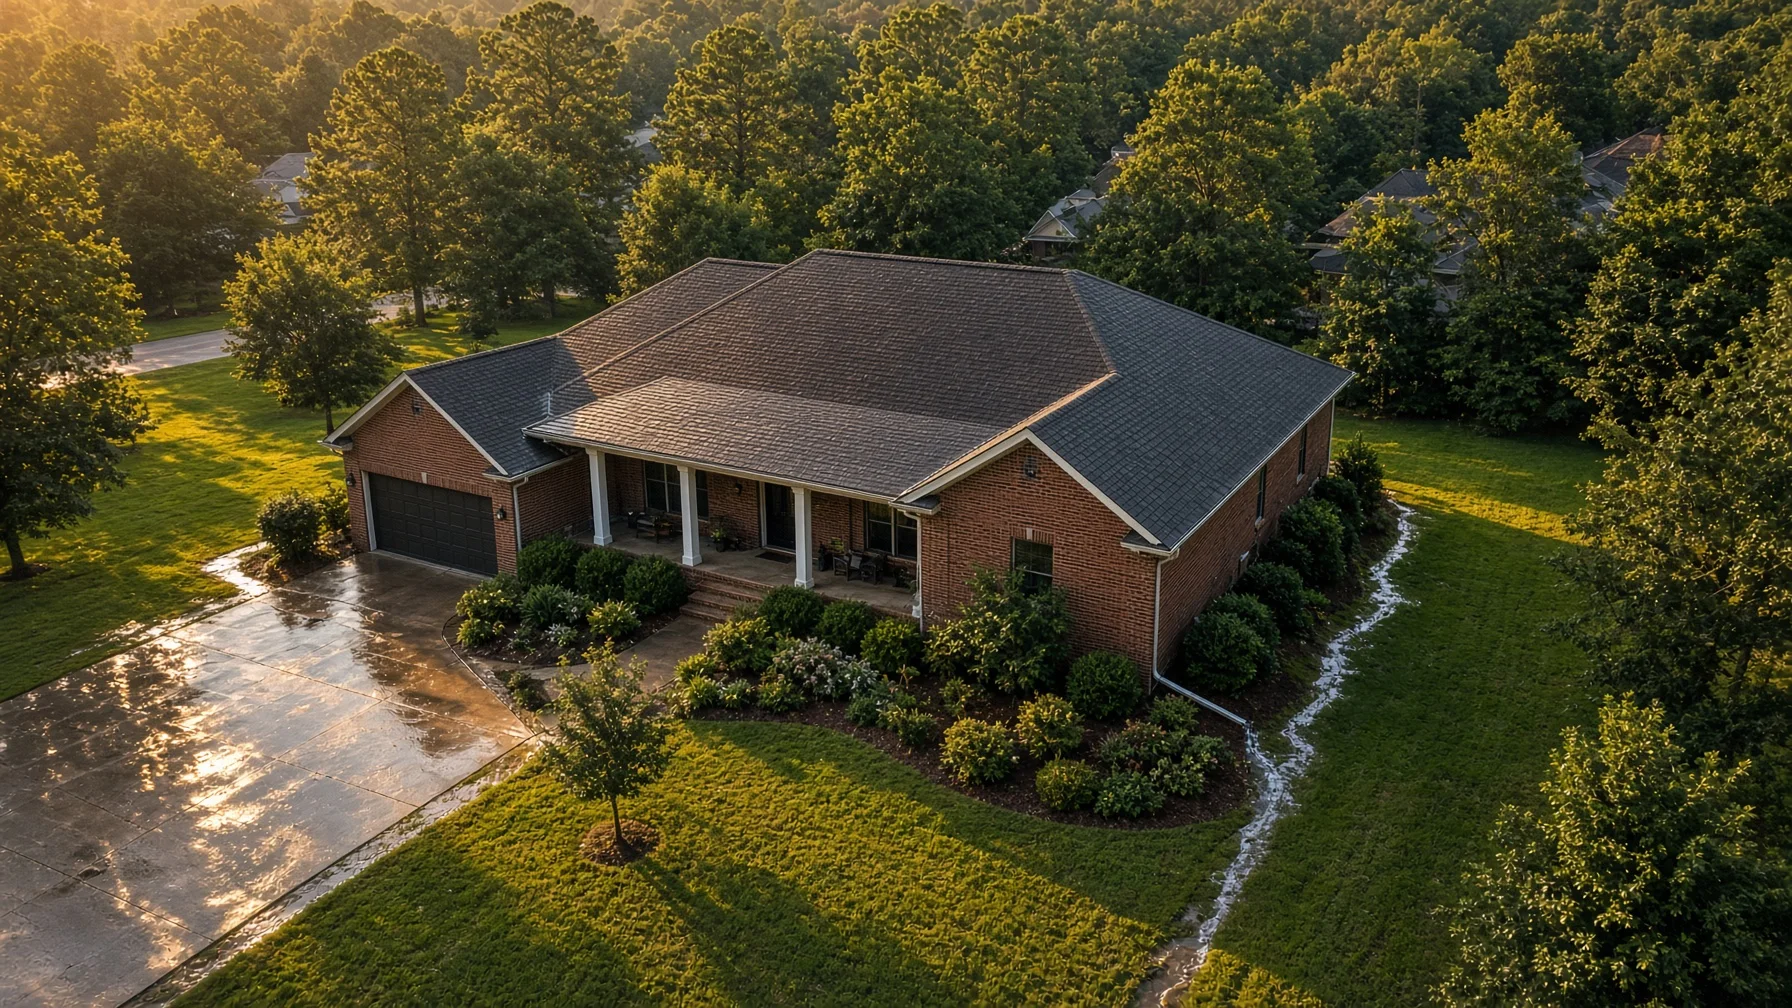
A drainage problem can be frustrating because the evidence is often scattered across the property. Water may leave the roof at one corner, cross a driveway, collect beside a retaining wall, cut through a lawn, and disappear into a ditch. A close-up photo can show one puddle. It may not show how that puddle relates to the rest of the lot.
That is where a well-planned set of drone photos can help. Aerial images can give homeowners and contractors a broader visual record of visible drainage features and runoff patterns. They can show where roofs, downspouts, paved surfaces, slopes, swales, ditches, culverts, bare soil, and low areas sit in relation to one another.
The key word is documentation. Drone photos can help describe what is visible. They do not prove the exact grade of a yard, establish a legal drainage easement, determine whether a system meets code, diagnose foundation movement, calculate stormwater capacity, or replace an inspection by a drainage contractor, engineer, surveyor, or other qualified professional.
Why runoff deserves a whole-property view
The U.S. Environmental Protection Agency explains that stormwater runoff forms when rain or snowmelt flows over land or hard surfaces such as roofs, streets, parking areas, and other impervious surfaces instead of soaking into the ground. As development adds roofs, pavement, and other hard surfaces, water can move across a property more quickly and in larger volumes.
For a homeowner, that means a drainage concern may involve several connected areas rather than a single problem spot. A downspout can discharge toward a driveway. The driveway can direct water toward a low corner of the yard. That low corner may show erosion or standing water after storms.
Aerial documentation is useful because one frame can show those relationships without claiming to measure them.
Start with one clean overview of the property
The most useful first image is usually a broad, nearly top-down view that includes the house and as much of the surrounding lot as practical. The goal is orientation.
Try to include the roof footprint, driveway, visible walks or patios, detached buildings, major retaining walls, drainage ditches, nearby street edge, and obvious low or bare areas. If the lot is large, create several overlapping overview images instead of flying so high that useful detail disappears.
This overview becomes the reference image for the rest of the set. When a contractor later sees a close-up of erosion near a downspout, the overview helps explain where that spot sits relative to the roof, driveway, property entrance, and rest of the yard.
Photograph every visible roof-drainage discharge point
Roof runoff is one of the easiest systems to document from above because gutters and downspout locations can often be placed in context with the ground below them.
Capture oblique photos showing each side of the home where downspouts discharge. Include enough surrounding ground to show whether the outlet appears to terminate on grass, a splash block, a buried extension, a driveway edge, a slope, or another visible drainage feature.
Do not use the drone to declare that a gutter has the wrong pitch or that a buried drain is clogged. Those are inspection questions. The useful record is simpler: this is where the roof edge is, this is where the visible downspout comes down, and this is what the surrounding surface looks like.
EPA homeowner guidance specifically recommends paying attention to where downspouts send water and describes options such as redirecting downspouts, rain barrels, rain gardens, trees, and reducing impervious surfaces as ways to manage runoff. That makes downspout context especially useful in a drainage photo package.
Show hard surfaces that may influence visible flow
Driveways, patios, walkways, pool decks, and other hard surfaces do not absorb rainfall the same way planted soil can. EPA stormwater guidance notes that impervious surfaces increase runoff because precipitation cannot readily infiltrate through them.
For documentation, photograph the entire driveway from an angle that shows the house, street, and adjacent yard when possible. Do the same for large patios and other paved areas.
Look for visible clues worth documenting, such as sediment streaks, washed mulch, recurring leaf or debris lines, staining, exposed aggregate, or obvious channels at pavement edges. These clues do not establish the cause of a drainage problem, but they can help a contractor decide where to look more closely on site.
Capture low areas, swales, ditches, and culverts in context
If the property has an obvious swale, roadside ditch, yard inlet, culvert, or channel, take both an overview and a closer oblique image.
For a ditch or swale, include the upstream and downstream context as far as the drone can safely and legally capture from the property. For a culvert, photograph both visible ends if they can be seen without entering unsafe or restricted areas.
Do not label a feature as a legal easement, municipal structure, or property-line drainage feature unless records establish that fact. A photo can show that a ditch exists. It cannot determine who owns it or who is responsible for maintaining it.
Photograph erosion without turning the image into a diagnosis
Erosion is often one of the clearest visible signs that water is moving across the surface. Useful images may show bare soil, small channels, washed-out mulch, exposed roots, sediment deposits, or a slope that has lost vegetation.
NRCS homeowner guidance emphasizes first identifying where runoff is coming from and observing how the roof, foundation area, driveway, lot shape, and nearby drainage pathways influence visible water movement. A drone can help document those relationships from above, especially on larger or sloped lots.
Still, avoid conclusions such as “this slope is unstable” or “this erosion will damage the foundation.” Those statements require more than a photograph. Keep captions factual: “bare-soil channel below driveway edge,” “washed mulch beside downspout,” or “visible sediment at ditch inlet.”
Document the foundation perimeter carefully
Aerial and elevated oblique images can help show how the ground around the house relates to downspouts, patios, retaining walls, and nearby low areas. They can also create a useful before-and-after record if drainage work is planned.
What they cannot reliably establish is exact foundation slope or whether water is entering below grade. FEMA homeowner flood-mitigation guidance discusses drainage systems around foundations in the context of protecting structures from water, but determining whether a specific home needs grading changes, drains, waterproofing, or structural work requires an on-site evaluation.
For drone documentation, photograph the perimeter from multiple sides and keep the frame wide enough to show the surrounding yard. If there is visible standing water, erosion, a discharge outlet, or a retaining wall nearby, include it without making a technical conclusion.
Take a second set after rain when it is safe
A dry-day photo set shows permanent features. A post-rain set can show temporary conditions that disappear before a contractor arrives.
If conditions are safe, photograph the same locations after a normal rain event: downspout discharge areas, driveway edges, low spots, swales, ditches, culvert entrances, retaining-wall areas, and visible erosion paths. Matching the dry and wet viewpoints makes comparison much easier.
Do not fly in dangerous weather, high winds, thunderstorms, or conditions outside the aircraft's operating limits. The goal is not to chase a storm. It is to capture conditions after the weather has passed and the flight can be conducted safely and legally.
Use repeatable photo positions
A drainage record becomes more useful when later images can be compared with earlier ones.
Save a simple shot list such as:
- Property overview from the street side
- Property overview from the rear
- North/east/south/west oblique views
- Each downspout discharge area
- Full driveway and street connection
- Patio or other large paved surface
- Each visible swale, ditch, inlet, or culvert
- Each erosion or standing-water area
- Foundation-side context where concerns are visible
If a contractor installs extensions, drains, a rain garden, new grading, or another solution, repeat the same views afterward. This creates a clean before-and-after record without claiming that the final photos certify performance.
What drone photos cannot tell you
A responsible drainage photo package should be explicit about its limits. Standard aerial photos generally cannot determine:
- Exact surface elevations or slope percentages without appropriate surveying or mapping methods
- Underground pipe location, condition, or blockage
- Soil infiltration rate
- Foundation waterproofing condition below grade
- Legal property boundaries or drainage easements
- Drainage-system capacity
- Flood-zone status by visual appearance alone
- Code compliance
- The cause of structural cracking, settlement, or moisture inside a home
If those questions matter, the photos should support—not replace—the appropriate survey, inspection, engineering review, contractor evaluation, records search, or other professional work.
A practical homeowner handoff package
When sending the images to a contractor, keep the package simple. Include one overview image with numbered concern areas, then attach the matching close-ups. Add the date and whether the photos were taken during dry conditions or after rain.
A short note is enough: “Area 1 shows water collecting beside the driveway after rain,” or “Area 3 shows recurring soil wash below the rear downspout.” Avoid diagnosing the solution in the caption.
This approach gives the contractor useful context before the visit and helps the homeowner remember what conditions looked like on a day when the problem was visible.
Drone-flight rules still apply over your own home
Owning the property does not remove federal airspace rules. In the United States, paid or business-purpose drone work generally falls under FAA Part 107. Controlled airspace may require authorization, and drones that must be registered generally must comply with Remote ID requirements.
The remote pilot is responsible for checking current airspace, temporary restrictions, operating limitations, people and vehicle considerations, and any other applicable requirements before launch. A useful drainage image is never worth an unsafe or unauthorized flight.
The bottom line
Drone photos are most valuable for drainage problems when they make the property easier to understand. They can connect a roof, downspout, driveway, low area, ditch, and erosion path in a way ground-level snapshots often cannot.
Keep the purpose narrow: record visible conditions, compare them over time, and give a qualified professional better context. When used that way, aerial photography can turn a confusing collection of puddles and washed-out spots into a clear visual record without pretending the camera has solved the drainage problem.
Frequently Asked Questions
Can a drone tell which direction water flows across my yard?
A photo may show visible clues such as channels, sediment lines, low areas, or connected drainage features, but a standard image does not establish precise grades or flow calculations. A contractor, surveyor, or engineer may need on-site measurements when exact drainage direction or slope matters.
Should I photograph drainage problems during a storm?
No. Do not fly in unsafe weather. A safer approach is to capture permanent features on a dry day and, when conditions allow, repeat the same views after rain has passed so standing water, sediment, or runoff evidence can be documented.
Can drone photos locate an underground drain pipe?
Not with ordinary visible-light photography. Aerial images can document visible inlets, outlets, downspouts, and surface features, but they should not be used to claim the location or condition of buried piping.
Are drone photos useful before hiring a drainage contractor?
Yes. A broad overview plus labeled close-ups can help explain where concerns appear and how they relate to the house, driveway, roof drainage, slopes, and visible ditches or swales. The contractor still needs to evaluate the property directly.
Can I use these photos as proof that drainage work fixed the problem?
They can provide useful before-and-after documentation, but photos alone do not certify design, code compliance, capacity, or long-term performance. Keep invoices, plans, permits, inspection records, and professional reports when those documents apply.
Source Notes
- U.S. EPA — Urbanization and Stormwater Runoff: https://www.epa.gov/sourcewaterprotection/urbanization-and-stormwater-runoff
- U.S. EPA — Sources and Solutions: Stormwater: https://www.epa.gov/nutrientpollution/sources-and-solutions-stormwater
- U.S. EPA — What You Can Do to Soak Up the Rain: https://www.epa.gov/soakuptherain/what-you-can-do-soak-rain
- U.S. EPA — NPDES Stormwater Program: https://www.epa.gov/npdes/npdes-stormwater-program
- USDA Natural Resources Conservation Service — After the Fire: Hillside Home Damage (homeowner runoff and drainage observations): https://www.nrcs.usda.gov/resources/guides-and-instructions/after-the-fire-hillside-home-damage
- FEMA — Homeowner's Guide to Retrofitting, drainage-system discussion: https://www.fema.gov/sites/default/files/documents/fema_hmd_fema_p-312-homeowners-guide-retrofitting_07152025.pdf
- FAA — Small Unmanned Aircraft Systems Regulations (Part 107): https://www.faa.gov/newsroom/small-unmanned-aircraft-systems-uas-regulations-part-107
- FAA — Part 107 Airspace Authorizations: https://www.faa.gov/uas/commercial_operators/part_107_airspace_authorizations
- FAA — Remote Identification of Drones: https://www.faa.gov/uas/getting_started/remote_id